


Hi Cuties!
So little backstory, I started sewing when I was probably about 7ish, but haven’t done it in a couple of years, who am I kidding, at least 10. But this year for my birthday, my boyfriend bought me a sewing machine and I have been reteaching myself how to sew. I know sewing is not for everyone and a lot of my readers probably don’t own a sewing machine, so while I am doing a sewing project this week, it is one that is small enough to do with hand sewing or even hot glue and I will note the steps that change if you chose to use one of these methods.
A little more backstory, my cousin just had a baby and when I asked him if he wanted to send me anything for the holidays, he said “Onesies.” Truly, all new parents need onesies. I thought it would be a great idea to make some. I am trying to do all handmade gifts this year, but I hit a problem. Turns out, they are harder to make than I would have thought. So I bought onesies. But I still wanted to add a personal touch and also decided to make something.
Finally, we get to the craft, we are making the easiest version of stuffed animals that there is. Now, there are a ton of free stuffed animal patterns online and they work great, however, patterns can be really daunting for new sew-ers. I promise this will be the easiest stuffed animal you will ever make.
To start you will need fabric. You can use an old shirt or any soft fabric you have lying around (keeps old clothes out of landfills,) I am using some leftover furry fabric I had from making a Jameriquai hat for a sketch show I was in. One note about using fury fabric, it’s harder and you have to be a lot more careful when sewing, so if you are feeling nervous about this project fury fabric is probably not the one to start with.
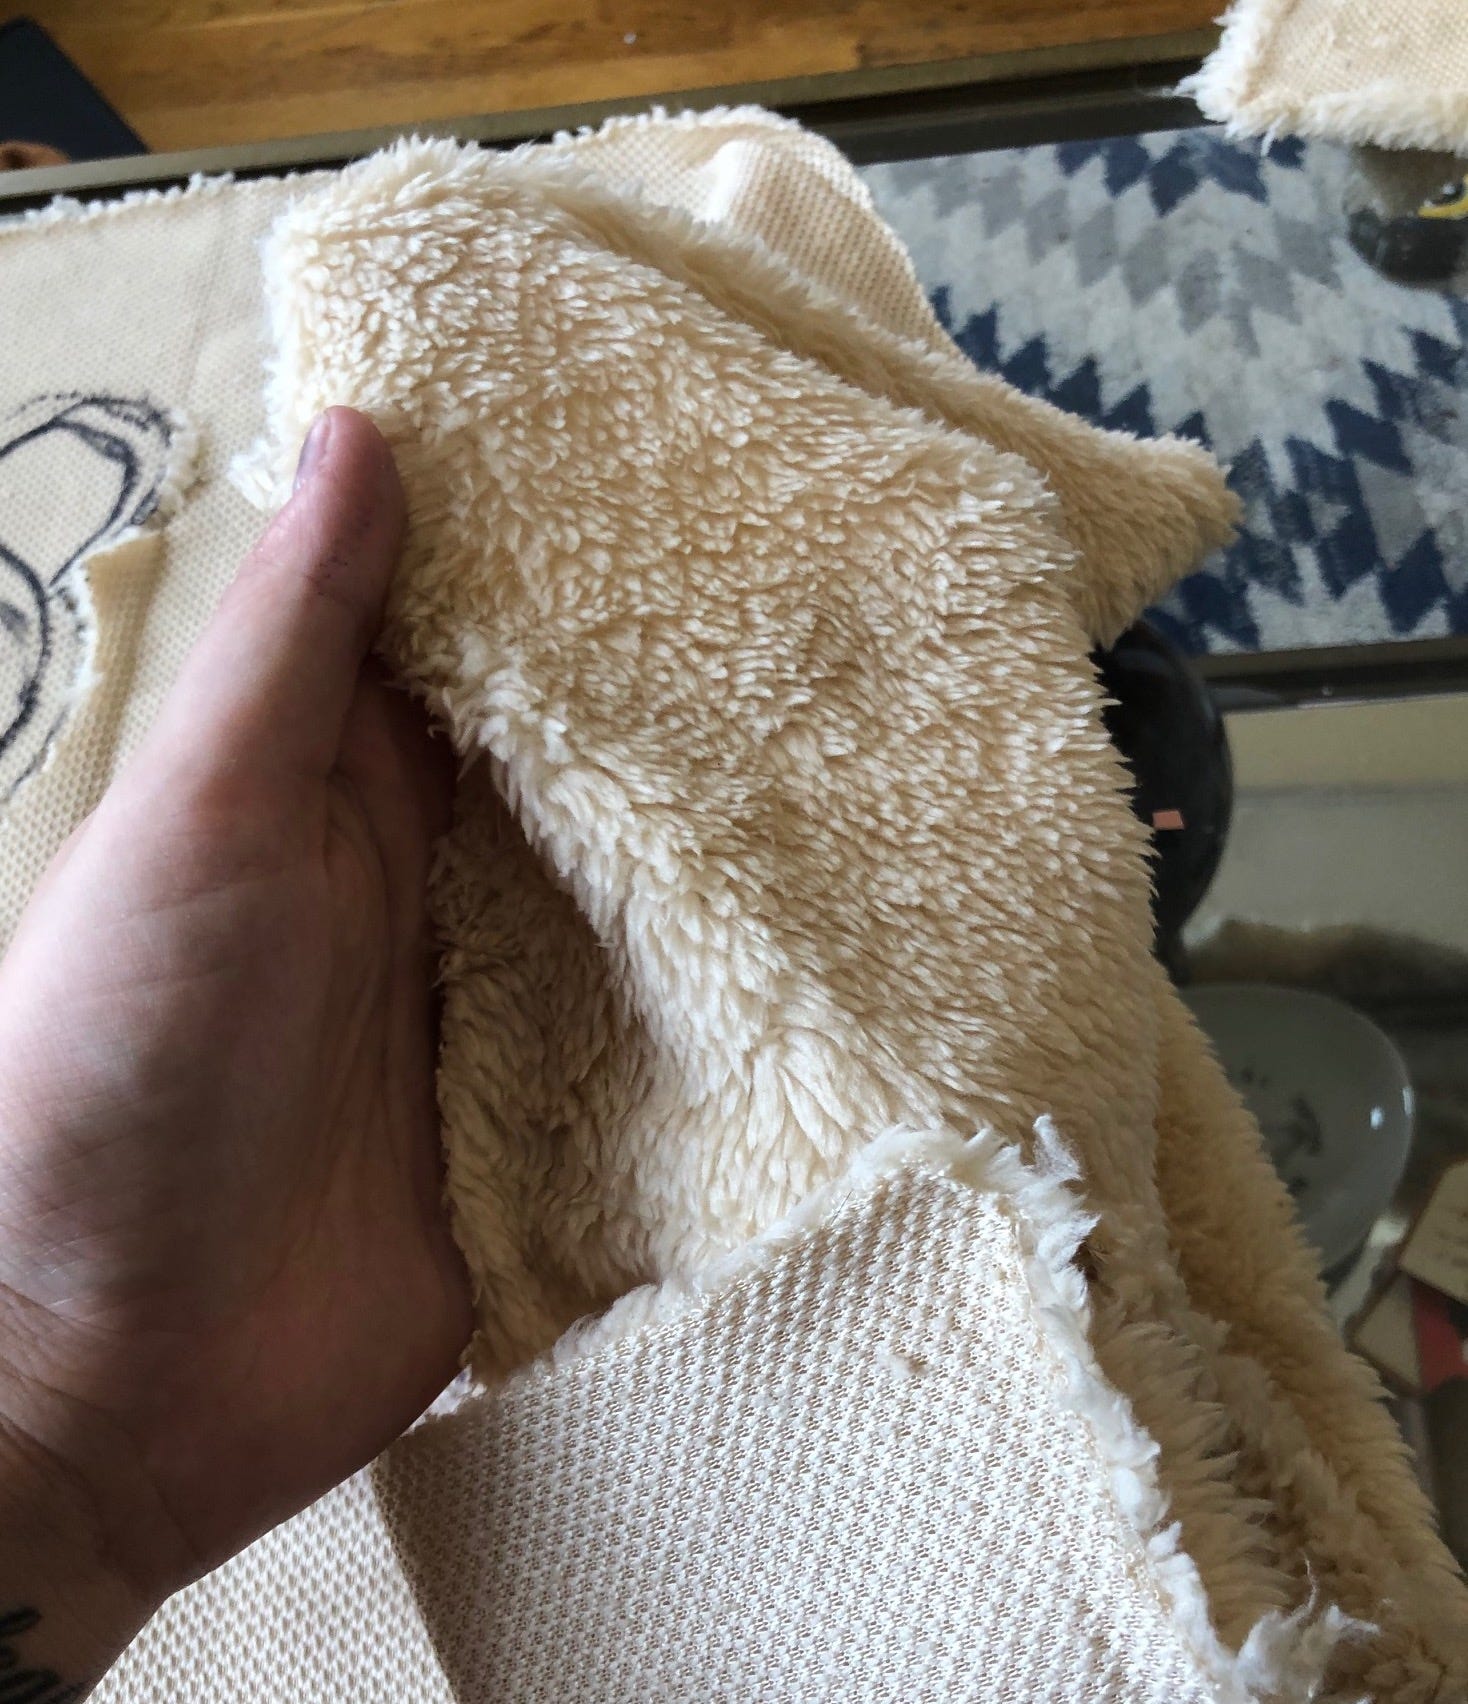
Whatever fabric you chose to use, lay it out upside down and get a pen out. Draw the shape of your stuffed animal. I am making a bear, so I drew about what a bear looks like. The easiest way is to draw a big oval and then a second oval coming out of it. Then ad some smaller ovals for arms and legs. It doesn’t have to be perfect, part of its cuteness will come from it not being 100% perfect. When you are happy with your outline, draw a second line around it about half of an inch out from the first line.
If you mess up, just redraw the line, this will all be hidden inside the stuffed animal, so it can be a little messy. If you are using a very light or thin fabric, be a little more careful or use a lighter color pen. When you are happy with your outline, cut it out around the second line.
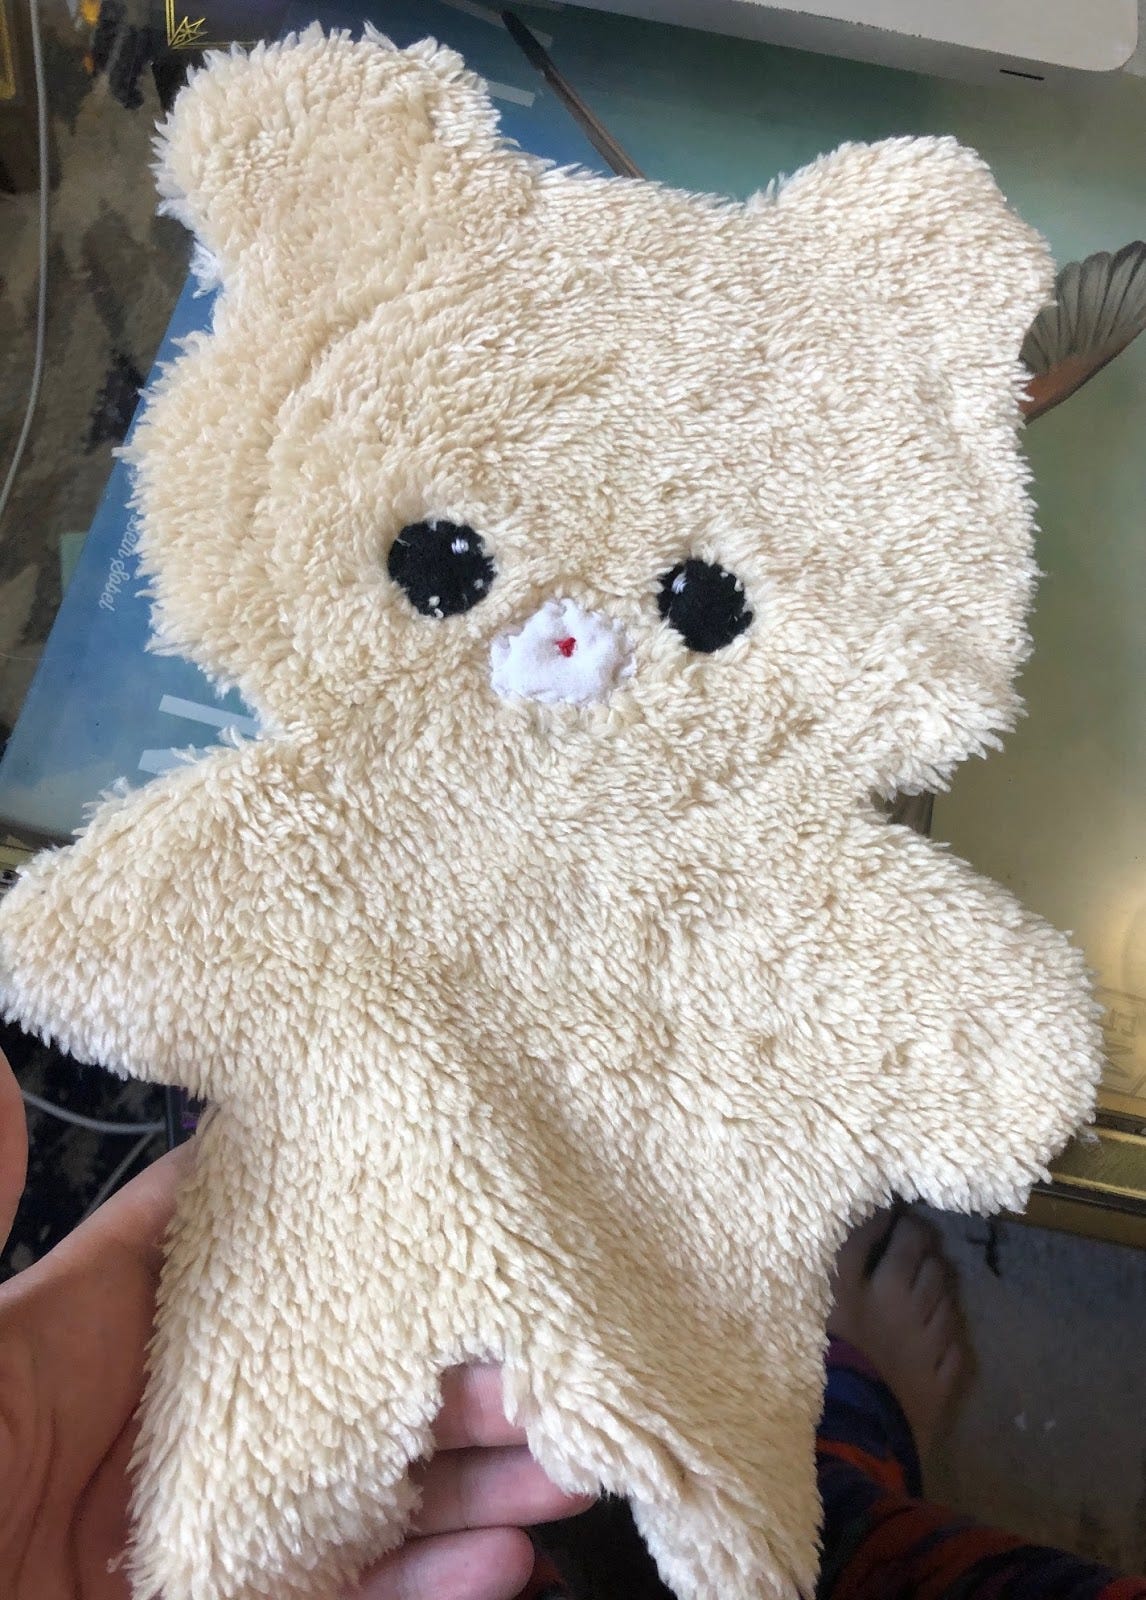
Now it’s time to add the face. If you are using glue, you can simply glue on the features, but I think it’s better to hand applique sew them. Applique is one of my favorite sewing techniques and it will give you a very cute face. If you have felt, it is the easiest to work with, but not necessary. I cut out two black felt circles from felt I had leftover from another project and an oval of white fabric from an old shirt.
I used an embroidery hoop to keep the fabric taut while I put on the face, this isn’t fully necessary, I just think it makes it a little easier to get everything to lay flat.

Once I was happy with my placement, I started sewing down my components. I used embroidery floss in the same color as the applique fabric for this, mostly for aesthetic reasons. Any thread should work, but it will show less if it is the same color. The important part is to make very small stitches that come through the applique fabric (and the base fabric) close to the edge of the applique and then come back down through the base fabric close to the other side of the edge. The smaller the stitch, the less it shows. You should continue with these small stitches around the full edge of the applique. They don’t have to touch each other, but they should be close.
It’s a little hard to show, but it should look something like this as you do each stitch.
Once I attached the eyes, I used the same process with the nose. I then decided to embroider some smaller features on top of the applique. I used a blanket stitch, which is just a set of stitches placed directly next to each other. I used white for the eyes and red for the nose. If you want to do this process and need help with embroidery notes, I did a whole newsletter on it.
In the end, I had a flat bear that looked like this.
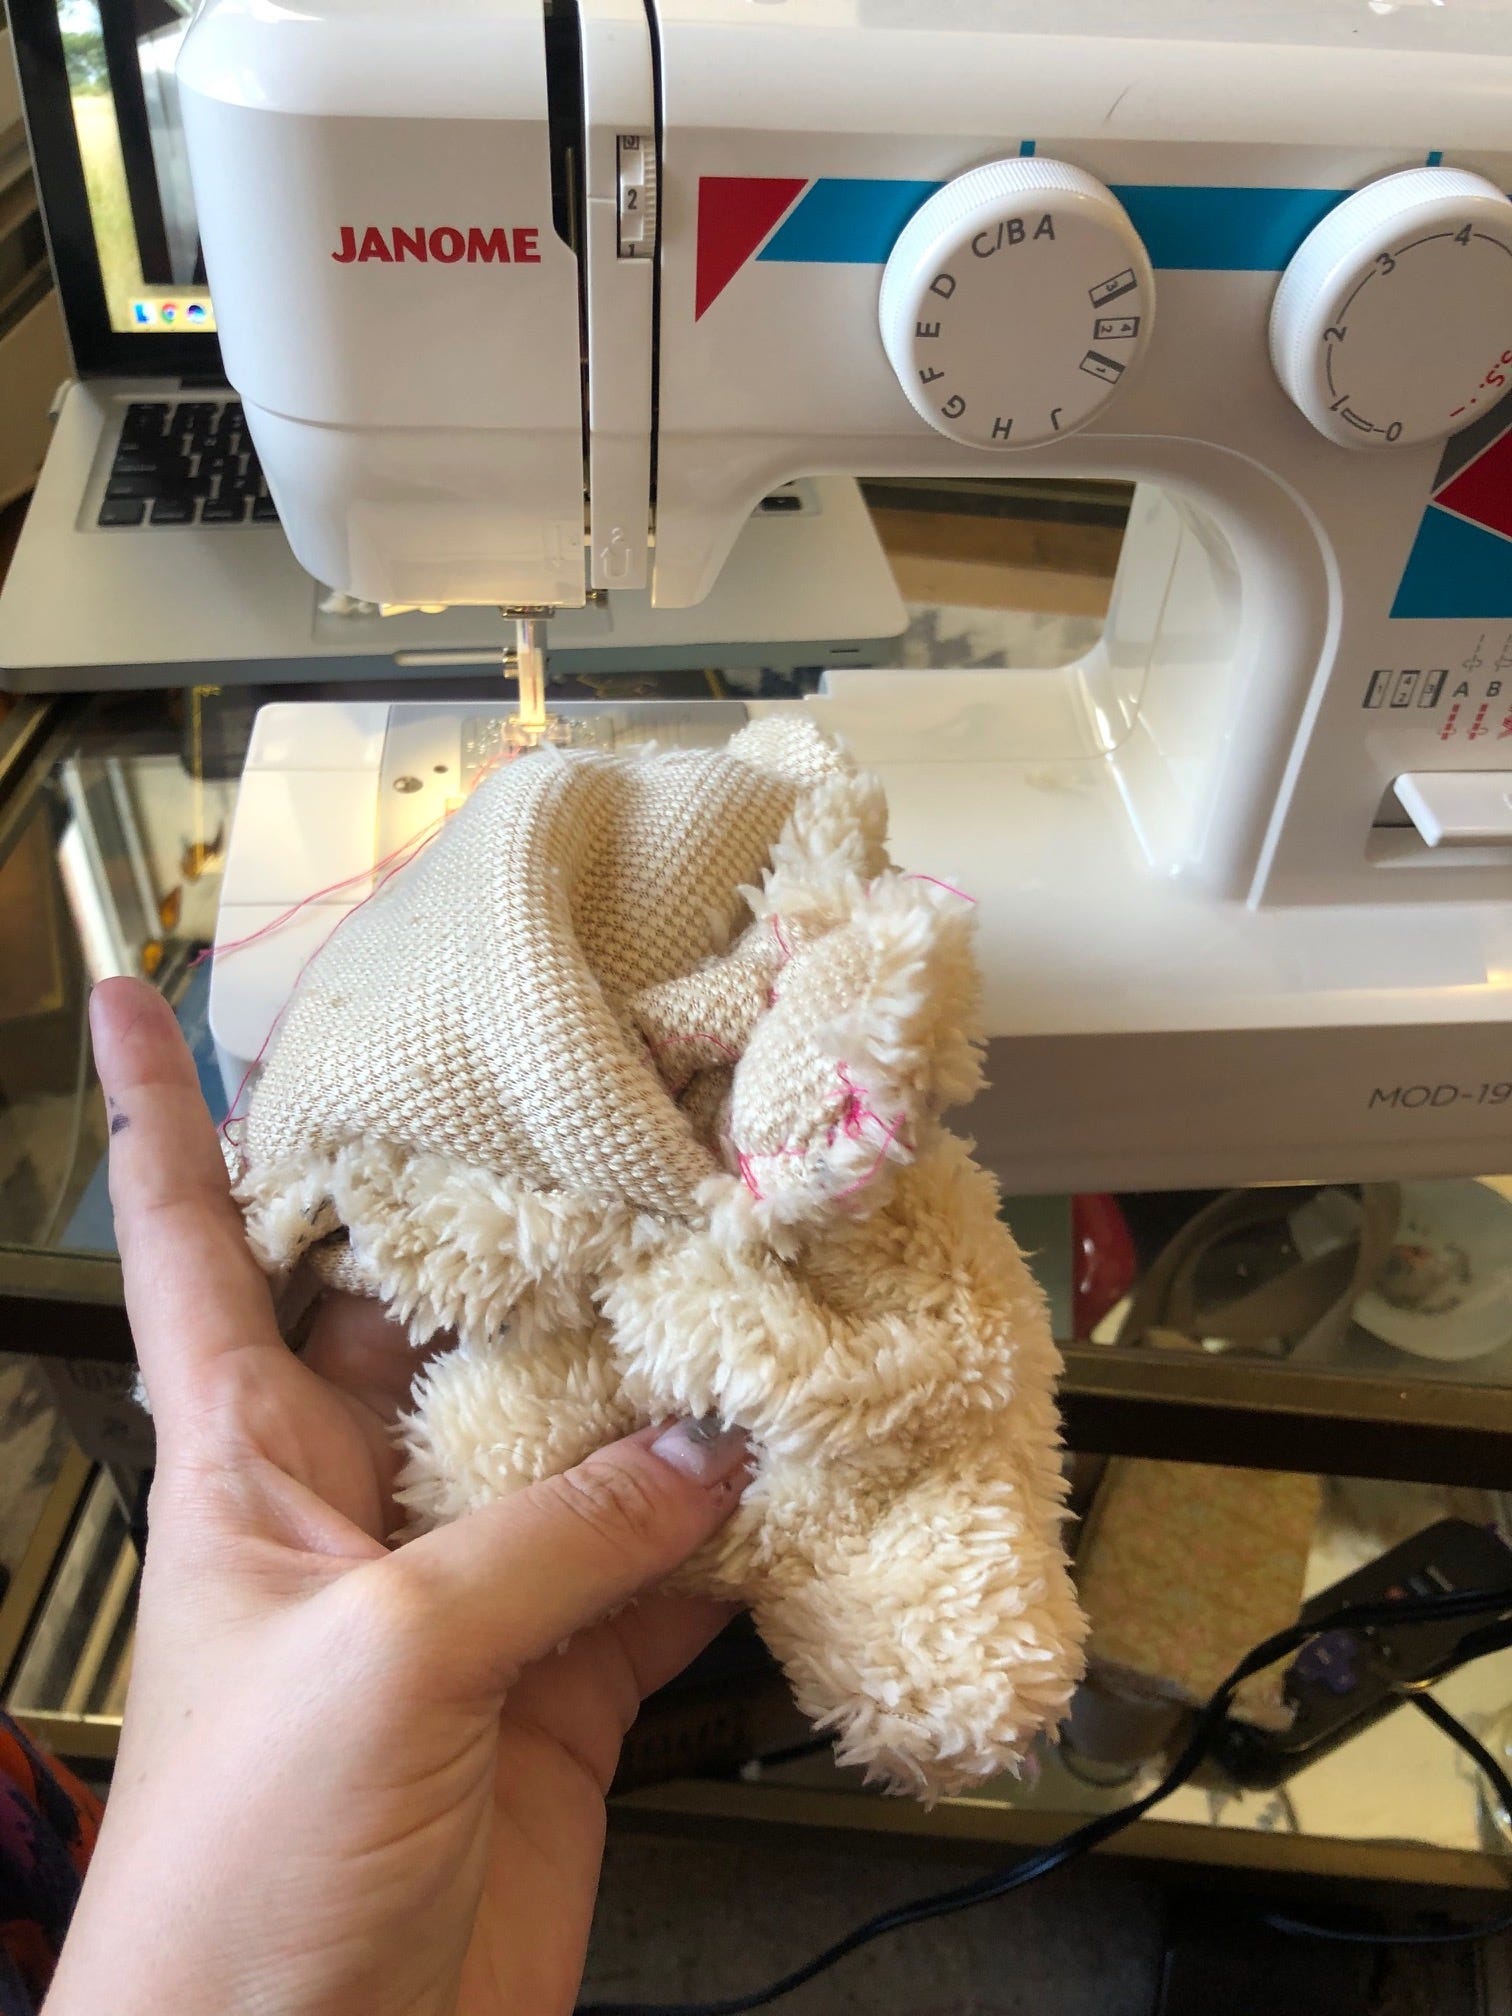
It was now time to make him 3d. Take your flat side and lay it on top of your fabric. The front sides of the fabric should be facing each other. Pin down your two sides and then cut the newly added piece so it matches the original side. I made this technique up, but I think it is really easy and saves some time. When you are done, should have two already pinned identical sides.

Now it’s time to attach the sides. If you are gluing, you want to take the glue and run it between the two sides as close to the second line as you can. Adding more pins rather than less will help you keep the glue line uniform. If you are sewing, the process is identical for hand or machine. You want to do a running stitch all around the inner line, leaving about an inch open (I did mine on the neck, but you can do it anywhere.) If you are using glue, you should also leave an inch unglued somewhere on the line.
The running stitch is the easiest hand stitch you can do. You simply take the needle and push it up through both sides of the fabric and then back down again through the fabric. You want to keep your stitches small. If you are using a machine, just do a basic stitch.
When you have sewn (or hot glued and the glue is dry) around the full bear except for your 1-inch hole, it’s time to flip the bear right side in. This process can be hard especially if you used a thick or fury fabric. You can always make a larger gap if you are worried.
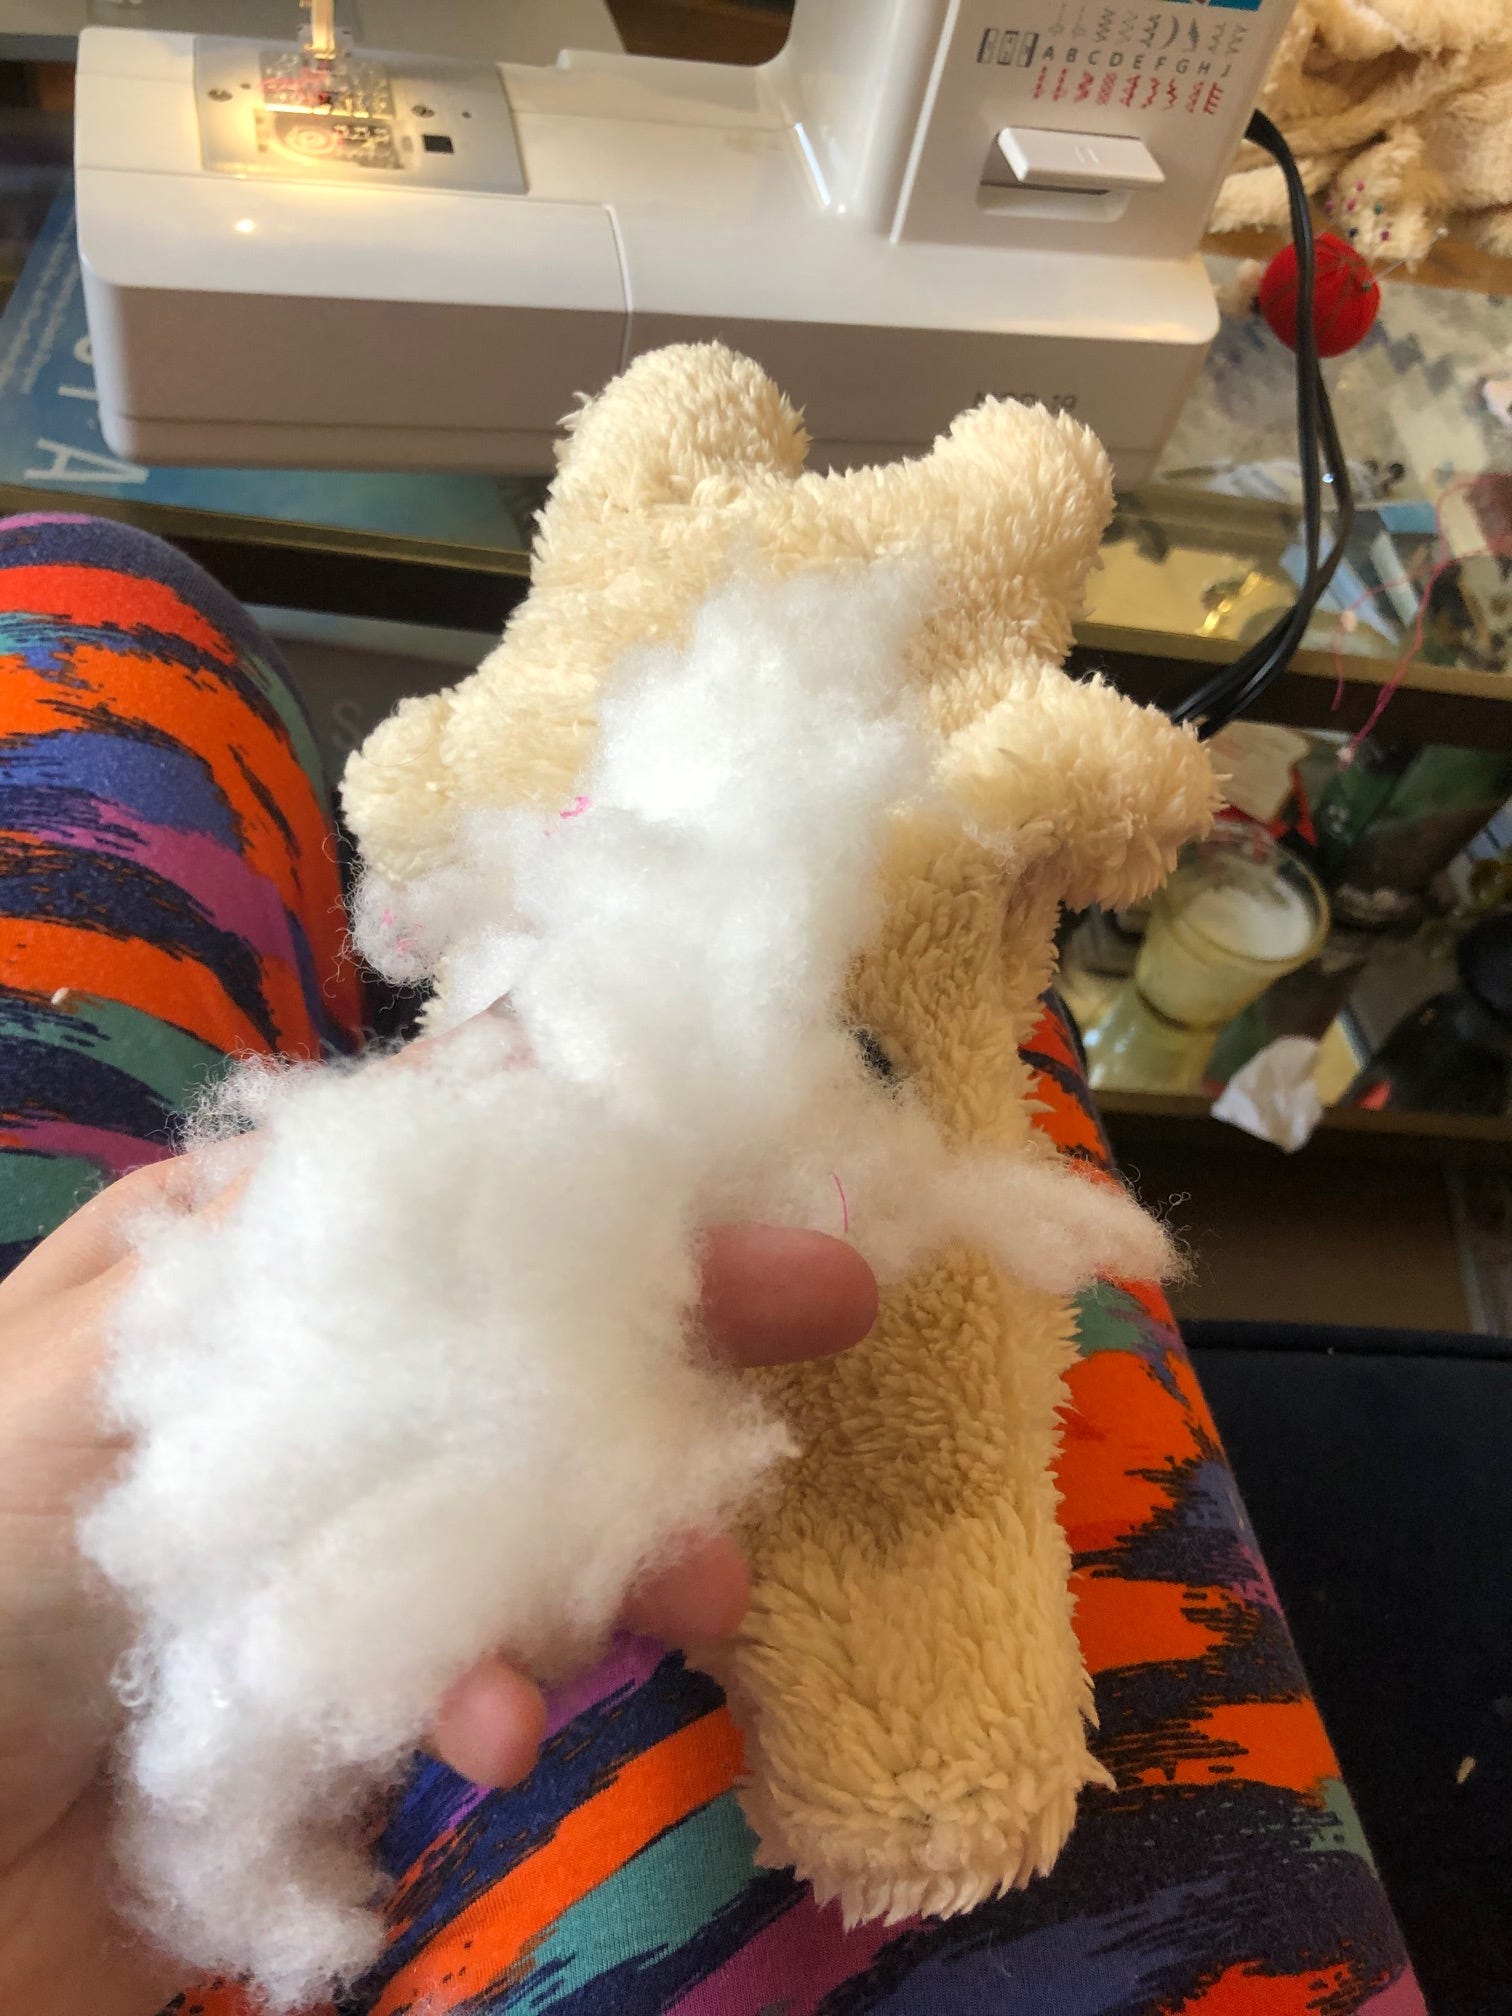
The biggest trick for this is to just go slowly. Push the fabric through the hole. You should see more and more of the outside fabric come out as you do this. I made my hole a little too small, so I had to carefully pull through each appendage, if your hole is larger, you should be able to kind of just flip it inside out in one more fluid motion.
Once outside is on the outside, make sure that all your appendices are all the way out and shaped. Often, they will not be fully flipped until you gently push them out from the inside. If you need to you can stick a pen or spoon in to help poke out any tricky corners or small ears, if they aren’t coming out easily.
Now it’s time to stuff. You can add as much stuffing as you want, but I would suggest, really packing it in there. It might feel a little stiff at first, but it will keep its shape better over time.
When it becomes hard to add more stuffing, you should be done. You can glue up the hole if you have been gluing this project, but I think the easiest method of finishing up, it actually hand sewing.
Get your needle out and hide the knot on the inside of the bear, now, just make stitches that join the two sides. When you have stitched all the way to the top of the hole, pull the string tight.

I then tied a bow around the neck of the bear and did a couple of small stitches to anchor the bow down. You don’t really need to do this, tying is usually fine. However, my big trick with ribbon is taking the ends and very lightly placing a lighter about a centimeter from them for a couple of seconds. The heat seals them and your ribbon won’t fray over time. Just don’t go too close, our you’ll burn your ribbon.
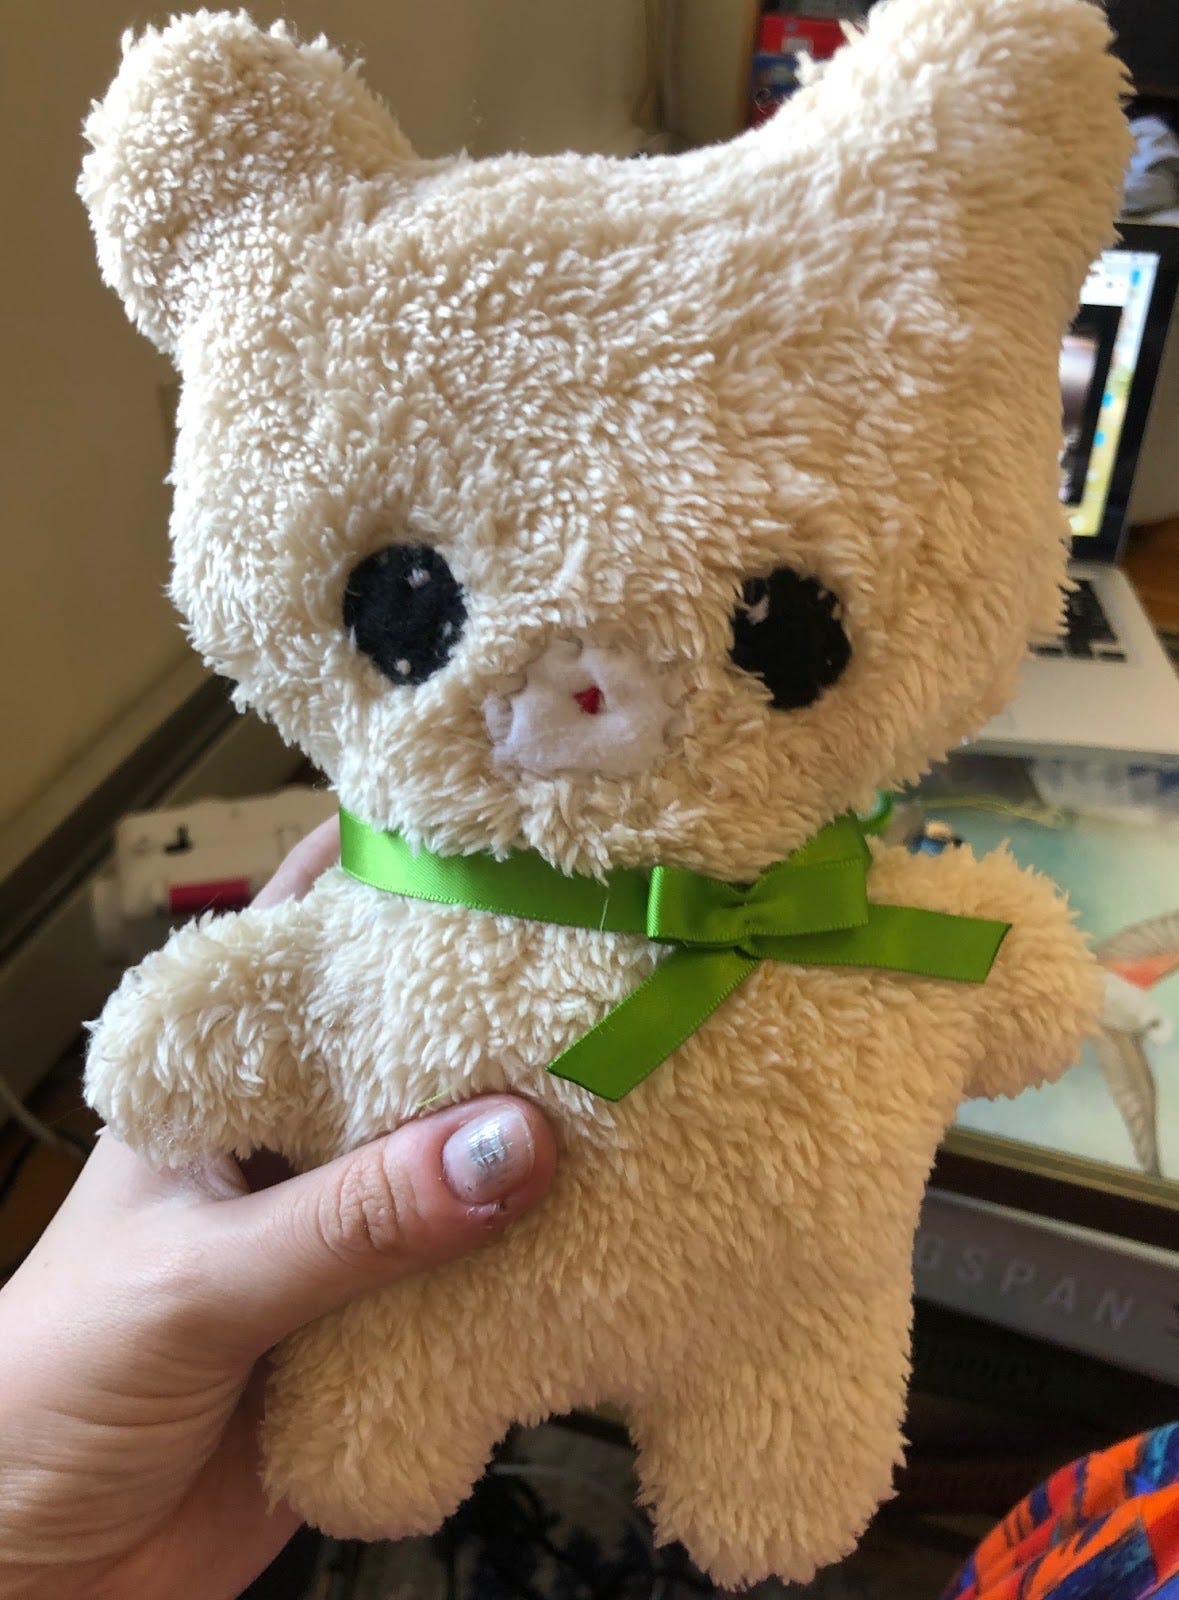
And there is your finished bear! Mine is going to a baby in Minneapolis, but if you make it, let me know where yours is going!
The holiday season is coming up fast and while I hope you are making (at least some) homemade gifts (like me!) for the people in your life, it’s also a great time to get gifts for children that might otherwise not get them. Supporting big charities is great, but some small charities in your area could also use the help. Here in NYC, the Black Womxn March is doing a drive for kids that you can learn about here. If you aren’t in NYC, looking for local drives is an amazing way to give back, or if you want to give to the Black Womxn March, I will be dropping off my own donations and would love to take yours with me (just email me and we can work it out).
As always stay safe, stay crafting!